Entertainment
Snoke – His Origins & Role in Star Wars

In the Star Wars universe, few characters have sparked as much interest and mystery as Snoke. A towering figure on the dull side, he had a tremendous impact on the three spin-off sets of the show, particularly in his part as the prominent pioneer of The Too Big With Arange. Despite its notable qualities, Snoke’s roots, powers, and ultimate destiny remain a point of contention among fans. This article takes a deep dive into the mysterious character of Snoke, investigating its roots, parts of the system, and its influence on the Star Wars saga.
Strange start to Snoke
Snoke’s opening with an appearance in Star Wars: The Constraint steers clear of legions of viewers wondering about its past. Standing over seven feet tall, with a face scarred and marred by cryptic hints, the Snoke radiates control and expert deliberation. In any case, the exceptionally small was almost familiar to him. His proximity to the format as a peerless guide to begin with was enough to position him as an extreme risk to the universe. However, despite this, Snoke’s backstory was shrouded in secrecy.
Snoke’s early life and creation
The true origins of Snoke were not revealed until the release of Star Wars: The Rise of Skywalker. It was in this motion picture that the mystery surrounding the creation and cause of Snoke was revealed. As it turns out, Snoke wasn’t a natural born Sith or a dull side client of old. Or maybe, he was a creation of Head Palpatine, who used dim Sith hypothetical alchemy to construct Snoke as a manikin pioneer. Palpatine needed to act as a front for his monstrous system to return to control, and Snoke served as the ideal vessel.
- Snoke as Palpatine’s Mannequin: Someone must lead the way to sort out Palpatine’s revival and return to control. This is where Snoke came in. Created in a lab using Sith hypothetical alchemy, the Snoke was a simple apparatus to serve the Emperor’s dull designs.
- Part of Snoke as Forerunner: Despite Palpatine physically creating Snoke, he still had a claim to control, which was in many ways independent of his creator. This pressure has made Snoke a dangerous figure, able to use dull side control to accomplish his goals.
Snoke’s influence on the Continuation Trilogy
Snoke’s impact on the universe and its core characters was significant, especially in driving Kylo Ren’s rise as the untapped pioneer of To begin with Order.
Snoke & Kylo Ren: The Ace and Disciple Dynamic
One of the most important parts of Snoke was Han Solo and Leia Organa’s child Kylo Ren as a tutor. Kylo Ren, whose birth title was Ben Solo, struggled with the lighter side of Constraint. Snoke exploited his weakness, controlling him to capture the dim side of the Force.
- Luscious Kylo Ren: Snoke saw the potential in Kylo Ren and took it upon himself to mold the young man into a skilled dim-side client. He fills Kylo with contempt for his family and reinforces his conviction that the light side is a weakness.
- Snoke’s controls: Snoke wasn’t a fair coach; He was a controller, pushing Kylo Ren towards darker choices and making him feel separate from everyone, counting his possessive family. His ultimate goal was to use Kylo Ren to further his claim, though this did not prevent Kylo from becoming increasingly hostile to Snoke’s control.
Snoke and Ray: Ghostly Menace
Rey, the protagonist of three consecutive sets, had a strange relationship with Snoke. Despite the fact that Snoke never mentored Rey directly, she played an important role in trying to bring him back to the dark side. Her attempts to stand up to Rey began in The Constraint Stirs, where she revealed her curiosity within him, discovering her unimaginable potential with the Force.
- Snoke’s Curiosity in Rey: From the beginning, Snoke was aware of Rey’s control. He saw her as a significant risk, someone who could possibly relegate her as the incomparable dim side figure of the universe. His desire to degrade her and lead her to the dull side was palpable, though Ray stood by his efforts at every turn.
- Snoke’s Limited Capabilities: Snoke’s drive utilization was phenomenal. He has portrayed the ability to clearly communicate with both Kylo Ren and Rey, showing the progression of his firm control over the Drive. His control allows him to control the events of the universe, making him a formidable opponent.
Destruction of Snoke
In The Final Jedi, Snoke’s control appeared at its peak, but its destruction was swift and shocking. In a tragic turn of events, Kylo Ren murders Snoke, seizing control to begin with making arrangements for himself. This minute was a pivotal point in the adventure, stamping the conclusion of Snoke’s reign.
- Kylo Ren’s Loyalty: In one of the most shocking scenes of the set of three, Kylo Ren turns on Snoke, killing him with a lightsaber while they are both in position in Snoke’s Authority Room. This act of loyalty highlights Kylo Ren’s desire for control and desire to break free from the influence of Snoke.
- Snoke’s Destiny: While the film doesn’t go into incredible detail around how Snoke played out, it’s clear that Kylo Ren’s control of Snoke was ultimately his undoing. His failure to anticipate Kylo Ren’s growing desire and thirst for control drove his downfall.
Snoke’s Will in the Galaxy
Although Snoke’s physical form was shattered, his legacy looms large over the universe. Kylo Ren, currently the Preeminent Pioneer, gained control of Snoke, but had a demanding vision for the galaxy—one that didn’t align with Snoke.
Snoke’s lasting effect on Kylo Ren
After Snoke left, Kylo Ren embraced Snoke’s mantle but looked to make way for his rights. Kylo Ren’s inner turmoil and his desire to control the world were influenced by the lessons of Snoke, but his motivations were driven by his ambition.
- Kylo Ren’s Battle: The events of Snoke push Kylo Ren to fully realize his dull side as a pioneer, but Rey and Drive’s lighter side lead him to make shocking choices in The Rise of Skywalker.
Snoke’s return in The Rise of Skywalker
In The Rise of Skywalker, it is revealed that Snoke was part of a much larger arrangement orchestrated by Sovereign Palpatine. The Sith Unseizing, a mysterious group working for Palpatine, created Snoke as a manikin to advance their plans for the recovery of the Sith.
- Snoke’s Association to Palpatine: Snoke’s creation was tied to Palpatine’s return, and it was revealed that Snoke was a manikin of Palpatine, planning to wreak havoc on the universe and control Kylo Ren and Rey.
- Control and Weakest of Snoke: Despite the destruction of Snoke, his part in the fading power of the galaxy was critical. She had a lasting effect on both Kylo Ren and Rey, actually influencing their ways after her death.
Conclusion
Part Snoke is one of three complications and puzzles in the Star Wars spin-off set. Despite him being a creation of Sovereign Palpatine, Snoke showcases him as a powerful figure in his own right, controlling key characters like Kylo Ren and Rey. His roots, however, were not fully captured until The Rise of Skywalker, where it was revealed that he was justly a part of Palpatine’s larger system. Despite his departure, Snoke’s impact on the universe and its characters continues to reverberate, making him one of the greatest, yet terrifying, figures in the Star Wars adventure.

Overwatch has a diverse cast of heroes, each with their own unique abilities and playstyle. Among these heroes, Soldier 76 stands out as a reliable and flexible character, engaging both modern players and veterans alike. As a tactical legend, Soldier 76 offers a mix of long portability, increased damage, and strong recovery abilities. This Direct will dive deep into Soldier 76’s abilities, its parts in different group compositions, tips and traps to maximize its effectiveness. Whether you’re new to diversion or looking to refine your Soldier 76 gameplay, this article will provide you with the knowledge you need.
Who is Soldier 76?
Soldier 76 (real title: Jack Morrison) is one of the founding figures of Overwatch, known for his military base and devotion to equity. After disbanding Overwatch, Soldier 76 became a rebel, seeking to bring down the Dependable for the organization’s destruction. His character and abilities may be direct but can be profoundly useful in a variety of situations, making him a perfect choice for players who favor an adaptable and reliable hero.
In-game, Soldier 76 fills a DPS (Harm Per Moment) portion, capable of dishing out static damage while giving his faction a Mending bolster. His obvious abilities and solid gunplay mechanics make him easy to learn, while his tactical toolkit rewards players who can use situations and timing to their advantage.
Power of Soldier 76
Understanding Soldier 76’s abilities is critical to getting him to the front lines. Let’s take a look at his full power kit:
1. Unstoppable bit rifle
Primary Fire: The unstoppable Beat Rifle is the essential weapon in Soldier 76. It’s a fully programmed ambush rifle that runs great and the rate of fire isn’t too bad. The weapon has no extraordinary tricks but exceeds expectations in yielding consistent, reliable damage from a distance.
Alternate Fire: Soldier 76’s alternate fire is the Helix Rocket. These rockets deal dangerous damage at short range, allowing them to clear out bunches of opponents or deal burst damage to a single target.
2. Sprint
Soldier 76 can activate Sprint, allowing him to move quickly for a short period of time. This ability makes him one of the more versatile damage dealers in the game, allowing him to reposition, avoid threats, or chase down opponents trying to escape.
3. Biotic field
One of the defining highlights of Soldier 76 is his Biotic Field, which creates a range around him that heals both himself and his teammates within a run. This ability offers both supportability and utility, allowing Soldier 76 to strengthen its group while maintaining its damage output.
4. Tactical Visor
Soldier 76’s strategic visar is his extreme ability. This in turn directs his unstoppable beat rifle at opponents inside his line of position, giving him the ability to land more shots with accuracy. This ability is ideal for turning the tide of a fight in crucial minutes, especially when combined with Soldier 76’s natural versatility and long damage output.
5. Helix rocket
As mentioned, Helix Rockets are Soldier 76’s secondary weapon, allowing him to fire dangerous rockets that deal serious damage. While they aren’t as flexible as his primary weapon, they can quickly clear swarms or clear the safe edges of key targets.
Soldier 76 in group compositions
Soldier 76 is a well-rounded legend who can fit into most group compositions. His abilities allow him to play an adaptable role, whether as an essential damage dealer or a support legend. Here are some common group compositions where Soldier 76 excels:
1. Classic Plunge Composition
In a plunge composition, the group quickly locked down opponents with taller versatile heroes like Tracer, Winston and D.Va diving into their backline. Soldier 76’s Sprint and Helix Rockets make him a solid choice in this composition, as he can keep up with faster heroes and deal damage from isolation. His biotic field also provides important recovery for submerged heroes, especially in the middle of powerful fights.
2. Composition of bunkers
A bunker composition revolves around setting up a watchful fort with heroes like Bastan, Odisha and Mei. Soldier 76 fits great in this composition, dealing high-range damage and rebounds. His unstoppable bit rifle can tear apart enemy tanks, while his Biotic Field guarantees the team will stay alive in extended engagements.
3. Consistent composition
A consistent composition mixes damage, tanks and rear heroes to create a flexible group. Soldier 76’s flexibility shines in such compositions, allowing it to negotiate damage and recover partners. He sets up well with heroes like Reinhardt, Zaria, and Anna, providing both hostile weight and support.
Tips and tricks for playing Soldier 76
Mastering Soldier 76 comes down to understanding its strengths, flaws, and ideal playstyle. Here are a few tips and tricks to help you get the most out of Soldier 76 in-game:
1. Use continuous sprints
Soldier 76’s sprint ability is a game-changer. Use it to transition between battles, chase down low-health opponents, or dodge when in danger. Sprint can be used to reach a destination quickly or to react to changes on the battlefield.
2. Use the biotic field strategically
Although the biotic field can be used anywhere accessible, it is essential to use it at the right time. Don’t waste it in situations where your group isn’t under immediate threat. Step by step, try sending it within minutes of the fight, such as when your group is locked in or when you’re fending off an enemy push.
3. Take advantage of the tactical visor
Soldier 76’s Strategic Visor is a functional tool that allows you to deal reliable damage with precision. However, it is important to use this power at the right time. Try to execute this when there is a cluster of enemies or when an enemy tank is causing difficulty for your group. When used correctly, strategic visas can quickly turn the tide of a battle.
4. Use the Helix Rocket for burst damage
Although Helix rockets are firm on their claims, they can also be used to safely dispose of targets as needed. Use them with tactical visors to guarantee maximum damage. Since the Helix Rockets have a short sprinkle sweep, they can be used to engage clusters of enemies or break through barriers.
5. What is situating?
Few other heroes in Soldier 76 don’t have the portability or failure ability, so positioning is crucial. Stay on the edge of battle, where you can do steady damage by reducing presentation. Be constantly aware of your surroundings, and use sprints to break away if you get out of position.
Soldier 76 vs other damage heroes
As Harm Saint, Soldier 76 faces competition from other heroes with comparable parts. Regardless, Soldier 76’s adaptability makes him interesting. Here’s how he compares to other well-known damage heroes:
1. Soldier 76 vs Reaper
Reaper excels in close-range combat and recovers by dealing damage. Regardless, Soldier 76’s increased ability, longer portability, and biotic field make him a better option in most situations. Soldier 76 can keep him isolated while dealing damage, while Collector thrives in close quarters.
2. Soldier 76 vs McCree
McCree offers long burst damage at medium to long range, but Soldier 76’s flexibility in development and recovery gives him an edge in supported group battles. Soldier 76 can act as both a damage and a healer, whereas McCree needs a recovery ability that keeps his team alive in extended battles.
3. Soldier 76 vs Hanzo
Hanzo is an effective specialist marksman, but Soldier 76’s ability to recover himself and his group while dealing reliable damage makes him more maintainable in long engagements. Hanzo is more reliant on landing headshots, though Soldier 76’s Strategic Visor and Helix Rocket give him an advantage in group fights.
Final thoughts on Soldier 76
Soldier 76 is one of the most flexible heroes in Overwatch. Whether you’re unaccustomed to diversion or a prepared player, Soldier 76 offers an available and fulfilling playstyle. His combination of increased damage, portability, and repair ability allows him to thrive in almost any faction composition. If you’re into a legendary with clear mechanics and the ability to make a huge impact in every recreation mode, Soldier 76 is the legendary for you.
Mastering Soldier 76 requires a great sense of situation, understanding when to use his abilities, and the ability to make quick choices under weight. By adopting these straightforward tips, you’ll be well on your way to becoming a more successful Soldier 76 player.
Regardless of the meta or your group composition, Soldier 76’s versatility and quality make him a fundamental saint for every Overwatch player’s program.
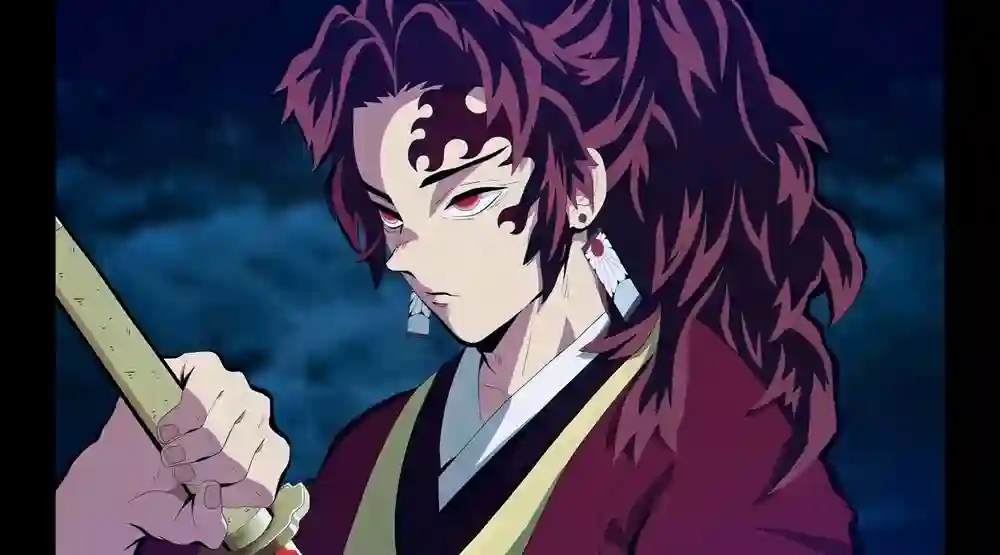
In the world of Evil Presence Slayer, one character stands out not only for his incredible control but also for the secret history behind his powers—Yoriichi Sugikuni. Known as the most grounded swordsman in the format, his story is one of unparalleled quality, abandon and skill. This article will take a deep dive into Yoriichi’s origins, powers, and importance, explaining why he remains a famous figure in the Evil Presence Slayer universe.
Yoriichi Who is Sugikuni?
Yoriichi Sugikuni is a central character in Devil Slayer, although he does not play a dynamic role in the present-day setting. Nevertheless, his influence is felt through the story, especially in the Domain of War and Evil presence in the history of the Slayer Corps.
A brief outline of the life of Yoriichi
Yoriichi was born into a family of destitute and depressed farmers, where his twin brother, Kokushibo, would play an essential role in shaping his destiny. Although Yoriichi was born with an unusual condition that required him to be able to speak legitimately as a child, his potential as a warrior was undeniable. Indeed at a young age, Yoriichi displayed exceptional physical and mental abilities that would eventually lead to his position as the most effective swordsman alive.
His early life and training
Preparations for Yoriichi began at a young age. As a child, he showed amazing skill in swordsmanship. Regardless, it wasn’t his physical prowess that set him apart; His otherworldly understanding and association with the world allows him to see the currents of life and transcend them in ways that others cannot. This special ability makes him a fantastic candidate for the Evil Presence Slayer Corps and paves the way for him to challenge the evil spirits terrorizing humanity.
Sword of Yoriichi
One of the central corners of Yoriichi’s quality is its unmatched sword. Equipped with breathing techniques—specifically the Sun Breathing style—Yoriichi could use his sword to defeat the most formidable opponents, counting the demons that terrorized the world. His mastery of these techniques, particularly Sun Breathing, allows him to fight at the highest levels, making him a central figure in the fight against demons.
Sun’s unique technique of breathing
The Sun Breathing Technique, also known as Hinokami Kagura, is a special and incredibly effective fighting frame that has passed through the ages. Yoriichi was the creator of this technique and it is considered extreme breathing fashion. This is said to be the unique shape from which all other breathing styles arose.
Features of Sun Breathing:
- High-Speed Attack: Yoriichi can make lightning-fast sword strikes, overwhelming his opponent with speed and precision.
- Intense Heat: The method is said to radiate tremendous heat from the sword, helping to improve its strength.
- Sunlight-Based Attacks: Attacks can weaken the Sun’s control properties and evil spirits, especially the effective High Moon and Low Moon, making it particularly useful in combat.
Yoriichi’s tremendous speed and reflexes
In addition to his ability with Sun Breath, Yoriichi Sugikuni was known for his otherworldly speed. In fact compared to other top-tier fighters like Hashira, Yoriichi’s speed was unmatched. He can fight several demons at once, effectively avoiding attacks and striking at the last minute. His development was so fast that they were almost invisible to the naked eye, cementing his notoriety as the fastest sword in the Devil Slayer’s world.
Key Skills:
- Instant Evolve: Yoriichi can move faster than anyone can react, making it sensible to hit him.
- Unparalleled Reflexes: His ability to see and repel attacks was at a level unmatched by anyone else.
- Precision Strikes: Yoriichi’s attacks weren’t faster but more accurate, focusing on key spots to quickly weaken fiends.
Yoriichi’s impact on the Evil Presence Slayer Corps
Despite its unparalleled qualities, Yoriichi was not driven by personal ambition. Instep, his commitment to killing evil presences and protecting mankind led him to commit his life to the cause. His influence on the Evil Spirit Slayer Corps cannot be overstated. Numerous methods and procedures used by the Corps today originated from his teachings.
Mentorship and succession
Although Yoriichi was the most skilled swordsman, his will included training and mentoring others, most notably his followers, Tanjiro Kamado’s predecessors. The lessons of Yoriichi allowed the future era to continue the war against Satan, indeed after his death. His will was passed down through the ages, influencing the exceptional core of the Devil Slayer Corps and creating their values of bravery and sacrifice.
Contribution:
- Breathing Techniques: Yoriichi’s development of various breathing styles, particularly Sun Breath, can be a foundation of preparation for Devil Slayers.
- Tactical Engineer: His brilliant approach to combat, calculating the flaws of the exploiting monsters, was essential to the Corps’ victories in various battles.
- Indomitable Will: When faced with truly unimaginable odds, her refusal was a key lesson for future generations.
Yoriichi Sugikuni’s terrific passing
Yoriichi’s conclusion came not from a need for control but from the cruelty of fate. Despite being the most gifted swordsman, his twin brother, Kokushibo, turned out to be an evil spirit and looked towards the conclusion of Yoriichi’s life. The fight between the two was amazing, but eventually, Kokushibo’s evil power and infinity gave him an advantage. Yoriichi was defeated but not cleared for some time recently behind a will that would shape the future of the Evil Spirit Slayer Corps.
Yoriichi’s effect on Tanjiro Kamado
Yoriichi’s influence extends even before his death, affecting the original protagonist of Evil Spirit Slayer, Tanjiro Kamado. Tanjiro’s relationship with Yoriichi is both otherworldly and ordinary. With the Hanafuda Hoops Tanjiro wears, Yoriichi’s Will survives, guiding him on his travels and eventually allowing Tanjiro to learn the technique of Sun Breathing.
Association through Hanafuda earrings
The studs worn by Tanjiro Kamado were originally worn by Yoriichi. These studs have a deep, common connection to Yoriichi, which speaks to the sun breathing fashion’s effective history and the quality that comes with it. They are just a basic excess but a signal of faith and quality that symbolizes the war against demons.
Importance of earrings:
- Legacy: Studs are Yoriichi’s connection to his past and his fight against ghosts.
- Powers: The reward of wearing them Tanjiro gains the powerful techniques that Yoriichi used to defeat the demons.
Legacy of Tanjiro’s Sun Breath
Through his fights and battles, Tanjiro eventually learns the Sun’s breathing method. While he may not be a close relative of Yoriichi, Tanjiro may be a beneficiary of Yoriichi’s methods and beliefs, exemplifying the same quality and determination.
Powers of Yoriichi in the setting of the Devil Slayer universe
Sugikuni’s part in the Yoriichi Evil Spirit Slayer universe is more than just being a capable fighter. His ability, calculating the breath of the sun, has created the world in a way that has significant effects on both the demon-slaying community and the devil.
Control of sun breath
The Sun’s breathing mechanism is not nearly physical; It speaks to an extreme degree of control over one’s body and mind. Yoriichi was the ace of this craft, and its control in combat was fairly speedy or limited. It was almost saddling and harnessing the Sun’s vitality in a way that no one else could.
Key points:
- Heat and control: The heat of the sun’s breath can actually burn the bad appearance with a rare touch.
- Legacy of Dominion: Yoriichi’s deep affinity with this method allows him to easily overcome evil spirits, with each piece having control of the sun.
Conclusion
Yoriichi Sugikuni’s story is one of unparalleled quality, of giving up and disaster. As the most grounded swordsman in the Evil Presence Slayer universe, his influence extends into his fleeting past, shaping the future of the Evil Spirit Slayer Corps and commanding an untapped era of warriors. His mastery of the Sun Breathing, his role as a teacher, and his incredible fight against evil spirits guarantee that his will will never be ignored. For fans of Evil Presence Slayer and newcomers alike, Yoriichi will continue to be a celebrated figure whose story transcends time.
Escape from Tarkov is known for its challenging tasks and confusing weapon customization framework. One mission that can be particularly precarious for Mote is Gunsmith Part 3, which requires players to collect a weapon for complex, detailed missions in certain areas. This article will guide you through the preparations for completing Gunsmith Part 3 from Tarkov to Elude, giving you step-by-step what you need to do, the parts needed, and key strategies for success.
Understanding the Gunsmith Part 3 requirements
Before getting into how to do Gunsmith Part 3 Total, it’s important to get what the mission entails. This assignment is part of the Gunsmith questline, given by Workman. Gunsmith Part 3 helps you assemble an AKM rifle with specific adjustments. Not at all like other parts of the questline, Gunsmith Part 3 has exceptionally specific prerequisites when it comes to connections and modifications, making it fundamental to accumulate the right components ahead of time.
Here’s a quick rundown of the key components you’ll need to properly collect an AKM for Gunsmith Part 3:
- AKM rifle
- Mountable sights
- Change the grip
- mouthpiece
- Stock attachment
Each of these elements has a specific requirement in the mission and it is important that they are carefully chosen to meet the correct decisions given.
- Gunsmith Part 3’s key step in total
- In total Gunsmith Part 3, follow the steps below to collect weapons effectively:
Step 1: Get the AKM Rifle
An AKM rifle is available to start at step Gunsmith Part 3. Although this is a common weapon in Tarkov’s Elud, without a doubt buy or discover one that has not been adjusted. You’ll need to start from scratch, as most modifications are required to meet certain travel criteria.
- You can buy AKM from dealers or discover it in the entertainment world.
- Avoid using a pre-modified AKM, as you will have to do all the mods yourself for the trip.
- Once you have AKM, you can start adjusting for Gunsmith Part 3.
Step 2: Include the required attachments
The Gunsmith Part 3 requires specific connections to incorporate into your AKM rifle. Below are the parts you need and how to include them:
Muzzle Device:
- You need to connect a gag gadget to reduce draw back. The DTK-1 gag brake is a popular choice for this search.
- Other integrated gag gadgets include the PBS-1 silencer if you’re into stealth, but no doubt it fits the bill.
Stock attachment:
- AKM stock modifications are critical to meeting Quest’s ergonomic requirements
- The CМ-4 buttstock is commonly used, as it offers conventional draw back control and ergonomics.
- Make sure the stock is compatible with the AKM you are using.
Sights and Optics:
- The AKM requires a specific mount to include the optics. For this mission you must select a corresponding location mount.
- The PK-06 Reflex Locate is a powerful option for extending pointing accuracy.
Don’t overlook the mount itself – installing a locate mount is an essential step in completing Gunsmith Part 3 on a regular basis.
Handguards and Grips:
- The right handguard for the Gunsmith Part 3 is fundamental to meet ergonomic needs.
- The B-10 handguard is a great choice, as it offers comfort and fits well with the AKM’s aesthetic.
- Additionally, introduce a hold like the RK-1 or TDI-KS to improve handling.
Step 3: Ensure all statistical requirements are met
Every part you add to an AKM rifle will affect its overall performance. For Gunsmith Part 3, you must guarantee that the weapon meets the following conditions after receiving:
- Ergonomics: Guarantee that your modification results in great ergonomics (referring to sturdiness and handling).
- Recoil Control: Weapons must have sensible draw back, which is accomplished by incorporating proper gag gadgets, handguards, and grips.
- Mounting Focus: Your connections must be compatible with the mounting focus on the AKM.
Once you have turned on all the necessary parts, check the stats. If you meet the search conditions, you can continue to hand it over to the mechanic.
Step 4: Test the weapon in the field
Before launching the AKM for Gunsmith Part 3, it’s always a great idea to test it out in the field. Take the rifle into combat and there is no doubt that it handles well. Check for any problems with draw back, ergonomics, or general circulation. If you take note of the problems, change the parts until the weapon is fully optimized.
Fixing common problems in Gunsmith Part 3
Sometimes, completing Gunsmith Part 3 can be questionable due to certain prerequisites. Here are some common problems players face and how to fix them:
- Weapon does not fit Prerequisites: If your weapon does not meet the exact specification, check the parts you used. Each component must coordinate the exact requirements of the search, calculating stocks, sights, and gag devices.
- Misconnections: Some players use inconsistent parts that look comparable but don’t meet the travel description. Double check the item names and make sure they match the AKM.
- Over-modification: Adding numerous unnecessary adjustments to your AKM can interfere with the ride. Stick to the essentials for Gunsmith Part 3 and avoid arbitrary customizations
Additional tips for Gunsmith Part 3
To ensure your victory in completing Gunsmith Part 3, here are a few additional tips:
- Plan Ahead: The AKM is a flexible weapon, but it can be overwhelming to assemble all the basic components. Check your stock or dealers to collect the required parts ahead of time.
- Check Online Guides: If you’re stuck on specific parts or stats, many players post guides on forums like Reddit, where you can compare builds and have no doubt that your AKM meets your travel needs.
- Don’t Increase: Accuracy is key in Gunsmith Part 3. Take your time and make beyond doubt that each connection is introduced properly, assemble the determinations provided by the search
Conclusion
Completing Gunsmith Part 3 from Tarkov to Elude can be challenging, but with the right approach, it’s a very fulfilling encounter. The key to victory is understanding the specific components required for the AKM rifle, guaranteeing all connections meet inspection specifications, and testing the weapon for functionality. Once you complete Gunsmith Part 3, you’ll have a custom AKM rifle ready for action and you’ll be one step closer to completing the Gunsmith questline.
Keep practicing, stay organized and consistently make your changes beyond a shadow of a doubt. With these tips of wisdom, you’ll be a total Gunsmith Part 3 in no time!

Flixpress Intro Maker – Create Free Intros Online Easily

Soldier 76 – Overwatch’s Tactical Hero Guide

Best Islamic Bio for Instagram | Short & Inspiring Islamic Bios

Yoriichi – Demon Slayer’s Strongest Swordsman Explained

Best Comments for Girl Pic – Cute & Stylish Girl Photo Comments

Gunsmith Part 3 – How to Complete in Escape From Tarkov

Best Profile Love DP & Cute Love DP Pics for WhatsApp

Rhysand – A Court of Thorns and Roses’ Dark Lord

Instagram Stylish Hidden Face Girl Pic | Cute & Attitude DP

Kyber Crystal – How Lightsabers Get Their Power
-
 Travel1 year ago
Onboardicafe.com Login Exploring the Delights of Onboardicafe
-
 Food & Recipes12 months ago
Five Food Products You Must Avoid Giving to Your Infant
-
 Sports1 year ago
The Most Popular Sports In The World
-
 Health & Fitness10 months ago
Suboxone Tooth Decay Lawsuits and the Pursuit of Justice Against Indivior
-
 Sports9 months ago
Smart Solutions for Football Field Maintenance
-
 Entertainment1 year ago
Navigating the Web: The Ultimate List of Tamilrockers Proxy Alternatives
-

 Technology4 months ago
Sustainable Practices in Video Production: Reducing the Carbon Footprint
-
 Sports9 months ago
Wearable Tech and the Future of Football