Automotive
The Ultimate Guide to Window Regulator Replacement

Introduction: Your car’s window regulator is a vital component that allows you to raise and lower your vehicle’s windows with ease. Over time, wear and tear can cause the window regulator to malfunction, resulting in issues such as slow or erratic window movement, unusual noises, or windows getting stuck in one position. When these signs occur, it’s crucial to address them promptly to ensure the safety and functionality of your vehicle. In this comprehensive guide, we’ll explore everything you need to know about window regulator replacement, including common symptoms of a failing regulator, the replacement process, and tips for ensuring a successful repair.
- Signs of a Failing Window Regulator: Before diving into the replacement process, it’s essential to recognize the signs indicating that your car’s window regulator needs attention. These signs may include slow or erratic window movement, unusual sounds while operating the window, windows slipping or falling down, or windows getting stuck in one position. Identifying these symptoms early can help prevent further damage and ensure a timely repair.
- Gathering the Necessary Tools and Materials: Before beginning the replacement process, gather all the necessary tools and materials to ensure a smooth repair. You’ll typically need a set of screwdrivers (both flathead and Phillips), pliers, a trim removal tool, a socket wrench set, and a replacement window regulator kit specific to your vehicle make and model. Additionally, it’s a good idea to have a workshop manual or online repair guide for reference during the process.
- Removing the Door Panel: The first step in replacing the window regulator is to remove the door panel to access the regulator mechanism. Start by using a trim removal tool to carefully pry off any trim pieces or covers around the door handle, armrest, and window controls. Once the trim pieces are removed, use a screwdriver to remove any screws securing the door panel to the door frame. Gently pull the door panel away from the door frame, being mindful of any electrical connectors attached to the window controls.
- Accessing the Window Regulator: With the door panel removed, you’ll have access to the window regulator mechanism inside the door frame. Depending on the design of your vehicle, the regulator may be secured with bolts, screws, or rivets. Use a socket wrench set to loosen and remove the fasteners securing the regulator to the door frame. Take note of the position and orientation of the regulator and any electrical connections attached to it to ensure proper reinstallation later.
- Replacing the Window Regulator: Once the old window regulator is removed, carefully disconnect any electrical connectors or cables attached to it. Then, compare the new window regulator kit to the old one to ensure they match in size and configuration. Attach any electrical connectors or cables to the new regulator as needed, following the manufacturer’s instructions.
- Installing the New Window Regulator: With the new window regulator prepared, carefully position it inside the door frame and align it with the mounting holes. Secure the regulator to the door frame using the appropriate fasteners, tightening them securely to ensure a snug fit. Double-check that the regulator is properly aligned and that all electrical connections are secure before proceeding.
- Reassembling the Door Panel: Once the new window regulator is installed, it’s time to reassemble the door panel. Start by carefully aligning the panel with the door frame and pressing it into place. Reattach any screws or fasteners that secure the panel to the door frame, being careful not to over-tighten them. Then, reinstall any trim pieces or covers that were removed earlier, ensuring they are securely in place.
- Testing the Window Operation: Before finalizing the replacement process, it’s crucial to test the operation of the newly installed window regulator. Reconnect the vehicle’s battery and test each window to ensure they raise and lower smoothly and without any issues. If any problems arise, double-check the installation to ensure everything is properly aligned and connected.
Tips for a Successful Replacement:
-
- Take photos or make notes of the disassembly process to help guide you during reassembly.
- Handle electrical components with care to avoid damage or injury.
- Use caution when working with sharp tools or heavy components to prevent accidents.
- Follow the manufacturer’s instructions and guidelines for proper installation and operation of the new window regulator.
Conclusion: Replacing a faulty window regulator is a manageable task that can be completed with basic tools and a little patience. By recognizing the signs of a failing window regulator early and following the step-by-step replacement process outlined in this guide, you can restore the functionality of your vehicle’s windows and ensure a safe and comfortable driving experience. If you’re unsure about tackling the replacement yourself, don’t hesitate to seek assistance from a qualified mechanic or auto repair professional. With proper care and maintenance, your car’s window regulator will continue to provide smooth and reliable operation for years to come.

It is true that we have cars to take us here and there to the office, to the shopping mall and taking the kids to school and back. This is not its primary purpose, however, because everything nowadays is about providing good first impressions and the vehicle that you drive around in does that very thing. This is why you need to do whatever you can to maintain your car’s interior and exterior at all times. Putting preventative measures into place is better than just waiting for the problem to occur and then addressing it.
This is one of the reasons why you need to invest in an affordable retractable car shade because this is the one thing that can protect your vehicle from not getting warmer on the inside and it protects your dashboard, your carpets and your seats. This is just one of the top ways to provide protection for your car in Australia and the following are some others that you might want to consider.
- Wash your vehicle regularly – This means doing it by hand and not bringing into those automatic car washes that do more harm than good. You need to remove dirt and debris as soon as it appears on your vehicle and have a system in place where you wash the car first with a reputable cleaning solution and then rinse it off well afterwards.
- Park with the car in mind – We do get a lot of sunshine here in Australia and so you have to take measures when you’re parking your car away from your home. Always try to find shade whenever possible and if there is a tree to park under, then that is where you go. You will, of course, have your car shade, but it needs a little bit of help as well.
- Get your vehicle coated – What is being referred to here is a ceramic coating that gives your paint a kind of shield that is working all the time to stop scratches from happening. It also makes the car a lot easier to wash and maintain.
These are solutions for the outside of your vehicle, but pay attention to the inside as well, especially under the bonnet. Get your engine serviced on a regular basis so that the oil and filter are replaced whenever they need to be.
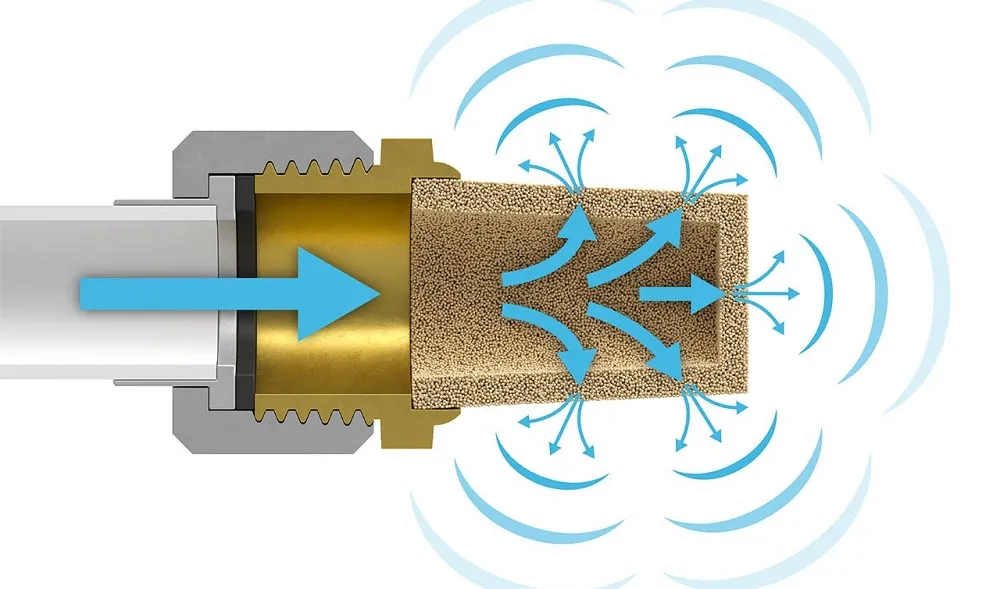
Pneumatic silencer, also called a muffler, are used in the automotive sector to lower the sound that happens when compressed air passes through the exhaust ports of the valve. Many scientists and experts have claimed that this noise is one of our biggest environmental hazards. Therefore, it is crucial that this noise is eliminated to lower the risk. In order to ensure that these mufflers offer the right service, it is essential that they should be replaced when necessary. Some companies remove the mufflers to minimize the downtime risk, but this tends to negatively impact the worker’s health and the environment.
Pneumatic silencers can reduce the sound level to a great extent
With the right technique it is possible to almost reduce most of the machine noise. Most of the machines have several mufflers to deal with the noise. This tool helps to divide the compressed air through multiple small holes to increase the frequency of sound to a level that is not harmful to the human ear. With the help of this tool, it is possible to reduce the sound level to 30-40 dB(A). This is significant since reducing the sound by 10 dB(A) is often considered to halve the sound level. This is often beneficial because:
- It lowers the risk of hearing damage and hearing ailments like tinnitus and hearing loss,
- It improves the overall work environment,
- And finally, it enhances the overall performance of the worker
Old mufflers can cause downtime and you have to replace them after a certain point of time. The flow through the tool will go down due to the accumulation of dirt particles which will clog the filter. The lower flow can be due to multiple reasons, such as:
- Presence of impurities in the compressed air,
- Presence of dirt in the pipes,
- Operating lubrication from the machine.
This is a very common problem in the industry. If the filter gets clogged, the compressed air gets stuck and creates a counterpressure on the valve. Therefore, it becomes all the more essential to identify the problems and replace the mufflers as soon as possible. A clogged muffler not only lowers the machine’s working potential but can also affect safety and lead to downtime risks. If the pressure gets too high, it can cause the muffler to explode.
Which muffler should you change?
When planning the downtime, it is best to examine all the possible mufflers and replace the clogged ones. This is an easy solution because some mufflers come with built-in warning indicators. If you find that there are indications of the muffler being clogged, then you should get it replaced ASAP. In case you are unsure, go ahead and replace all the mufflers—the ones that are working and the ones that are faulty. However, this will be an expensive solution since you have to replace all of them.
Alternate solution:
There is another solution that you can opt for. Why don’t you install a breather vent? This tool is very effective because when you install it, you can enjoy the following:
- This vent helps to equalize the pressure inside the container or the system,
- It helps to keep out the dirt, dust and moisture from the filter,
- It prevents the tanks from exploding due to the increase of the pressure inside the tank,
- It reduces corrosions and emissions,
- And finally, it helps to improve the overall safety of the equipment.
Summing it up: Without any delay, the moment you identify that the muffler is creating issues, you should get it replaced. Find out who are the leading dealers of pneumatic silencers and breather vents in your city. Get in touch with them as and when needed.
Read More latest Posts
- Funny Filipino Names: 675+ Cool & Creative Ideas for a Good Laugh
- Kokushibo: The Deadly Upper Rank One in Demon Slayer
- How Many 1/4 Cups Make 1/2 Cup? Plus Air Fryer Alexia Sweet Potato Fries
- Goku: Son of Bardock and Earth’s Legendary Warrior
- How Many 1/4 Cups Make 1/2 Cup or 1 Cup? A Simple Measuring Guide
Automotive
Embracing Outdoor Adventures with Grundig E-Bikes: Sustainable Lifestyle and Quality Connections

E-bikes are reworking outside experiences by blending the thrill of cycling with a high-tech boost. Grundig’s e-bikes stand out in this area, imparting sustainability and exceptional reviews in natural settings. With eco-friendly benefits, zero emissions, and supportive capabilities for riders of various ability tiers, the Grundig e-bike concept presents a really perfect choice for the ones searching for an environmentally aware and fun lifestyle.
E-Bikes and Eco-Friendly Mobility
Grundig e-bikes provide zero carbon emissions, a key gain for eco-conscious people. Unlike gas-based totally automobiles, these e-bikes produce no harmful exhaust, allowing customers to experience their adventure even while minimizing their carbon footprint. For those concerned about environmental impact, Grundig’s e-bikes enable customers to experience a low-emission lifestyle without sacrificing consolation or mobility.
Grundig gives fashions geared up with durable motors designed for electricity performance, making sure an easy journey over lengthy distances. This makes them a perfect opportunity for traditional motors for commuting, permitting riders to avoid site visitors while embracing an eco-friendly tour alternative.
Exclusive Usability and Versatile Features
Grundig e-bikes are constructed in the progressive era and have consumer-pleasant designs, making them reachable to numerous riders. The GCB-1 and ETB2800 models, for example, integrate effective vehicles that allow riders to tour over distinct terrains easily. Grundig’s attention to ergonomic designs and excellent components additionally makes these bikes easy to perform, giving customers more desirable balance and control.
The mid-engine placement complements weight distribution, providing dynamic help that adjusts to riding situations. Whether tackling steep trails, going for leisurely rides, or wearing masses, Grundig e-bikes’ versatility makes them appropriate for any adventure. Riders can navigate challenging routes with the peace of mind of a dependable and adaptive era that enhances their herbal power and movement.
Lifestyle Benefits: Closer Connections with Nature, Friends, and Family
Beyond green advantages and technology, Grundig e-bikes promote a lifestyle that emphasizes quality time with loved ones. E-bike excursions foster a unique way to bond with buddies or circle of relatives members with the aid of sharing scenic trails, exploring new paths, or even organizing group rides. By replacing noisy, gas-driven vehicles with these silent, green e-bikes, riders can immerse themselves in the sounds and sights of nature, making outdoor time feel more proper and worthwhile.
E-bikes are, in particular, attractive for outside lovers who respect the balance of nature with a touch of comfort. With capabilities that lessen the strain on longer trips, Grundig e-bikes permit riders of different ability ranges to experience prolonged trips without physical discomfort, making them best for casual family outings and group rides alike. This accessibility opens up opportunities for all of us, from novices to pro cyclists, to share in the experience of cycling collectively, creating lasting reminiscences and deeper connections.
Health and Wellness Perks of E-Bike Riding
Incorporating e-bike rides right into a weekly recurring can yield sizable well-being benefits. E-cycling combines aerobic exercising with low-effect aid, which means riders can improve their cardiovascular health and average health tiers while reducing joint pressure. This stability encourages normal physical interest, which is critical for retaining bodily and mental well-being. Grundig e-bikes allow users to regulate the extent of help so riders can manipulate their intensity and revel in the bodily advantages without overexerting themselves.
Riding in herbal environments additionally benefits mental fitness, decreasing strain stages and fostering a feeling of relaxation and mindfulness. E-motorbike rides encourage people to step far from screens, spend more time outside, and disconnect from everyday stresses, creating a pathway to intellectual rejuvenation.
E-Bikes for Daily Convenience and Exploration
Grundig’s e-bikes are properly suitable for city commuting, short errands, or extended rides in the natural environment. As a bendy mode of transport, they make short-distance commuting clean and exciting, even putting off some of the hassles related to vehicle journeys, including parking and fuel expenses. This makes e-bikes, in particular, attractive to city dwellers who need efficient, hassle-free travel and people in rural areas looking to discover widespread trails.
Their ease of use additionally aligns with the growing fashion in the direction of multi-modal transport. E-bikes can complement public delivery or act as a dependable automobile substitute for quick to medium distances. Grundig’s models, geared up with effective batteries, allow riders to cover giant distances at an unmarried price, giving customers the freedom to discover without worrying about recharging.
Cost-Efficiency and Low Maintenance
Switching to e-bikes may be a cost-effective desire. Grundig’s e-bikes have minimal gas and renovation charges in comparison to traditional automobiles, as there are no gasoline fees and fewer mechanical elements to service. While the preliminary funding can also seem huge, the long-term savings in fuel, parking charges, and maintenance make e-bikes an intelligent financial selection. Furthermore, with Grundig’s exceptional substances and dependable guarantee, users can believe that their e-bikes will offer a lengthy period of cost and performance.
Conclusion
Grundig’s e-bikes encapsulate the destiny of sustainable mobility while promoting a lively, nature-connected lifestyle. Their zero-emission operation, versatility, and luxury functions lead them to be an attractive choice for every person trying to experience the outdoors in an eco-conscious way. These e-bikes offer customers greater than just a mode of delivery; they provide a gateway for high-quality experiences, whether or not commuting, exploring nature, or bonding with pals and their own families.
As extra humans prioritize sustainability, health, and first-class time, Grundig e-bikes end up a super answer, blending the pleasantness of technology and eco-aware layout. They invite humans to embody an adventurous, wholesome lifestyle while having a nice effect on the surroundings, redefining the way we view outdoor excursions and each daily commute.

Funny Filipino Names: 675+ Cool & Creative Ideas for a Good Laugh

Kokushibo: The Deadly Upper Rank One in Demon Slayer

How Many 1/4 Cups Make 1/2 Cup? Plus Air Fryer Alexia Sweet Potato Fries

Goku: Son of Bardock and Earth’s Legendary Warrior

How Many 1/4 Cups Make 1/2 Cup or 1 Cup? A Simple Measuring Guide

Deku: The Rise of Izuku Midoriya in My Hero Academia

Among Us Character: Explore the Fun Gameplay and Tasks

Explore Dandy’s World: A Cute Yet Deadly Roblox Horror Game

Inosuke: No Time for Weak Thoughts in Demon Slayer

Big Cat Wife, Past Affairs, Net Worth, Family, and Bio: Is He Married?
-
 Travel1 year ago
Onboardicafe.com Login Exploring the Delights of Onboardicafe
-
 Food & Recipes1 year ago
Five Food Products You Must Avoid Giving to Your Infant
-
 Sports1 year ago
The Most Popular Sports In The World
-

 Technology5 months ago
Sustainable Practices in Video Production: Reducing the Carbon Footprint
-
 Sports11 months ago
Smart Solutions for Football Field Maintenance
-
 Health & Fitness12 months ago
Suboxone Tooth Decay Lawsuits and the Pursuit of Justice Against Indivior
-
 Entertainment1 year ago
Navigating the Web: The Ultimate List of Tamilrockers Proxy Alternatives
-
 Sports10 months ago
Wearable Tech and the Future of Football